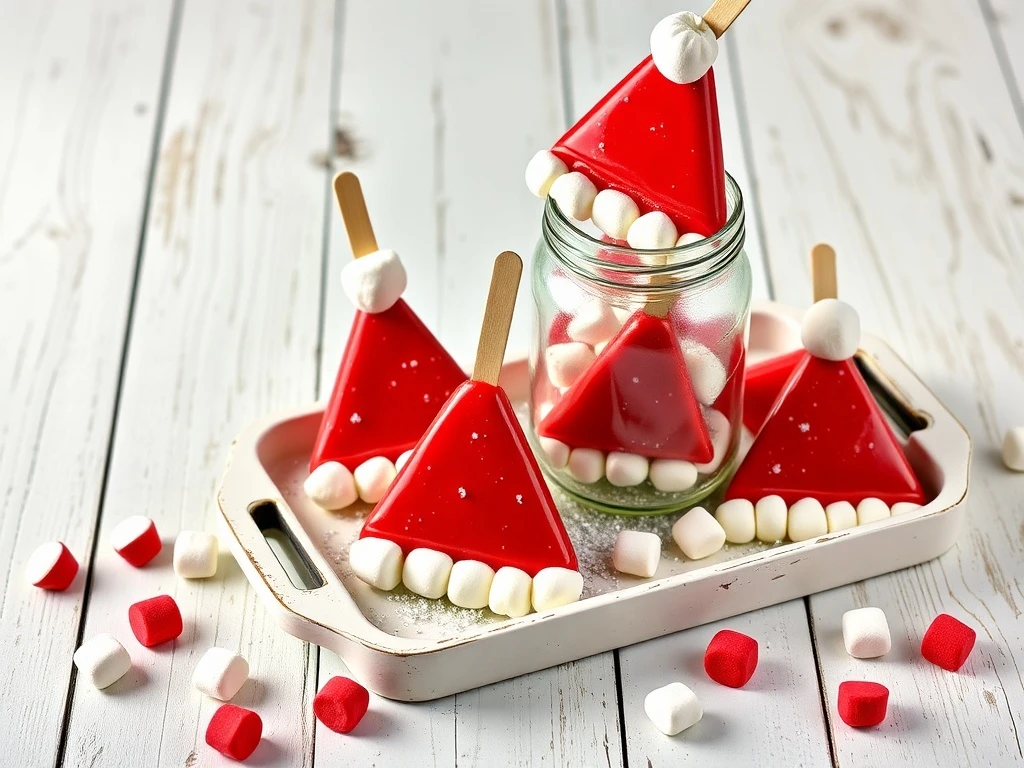
Festive no-bake treats that look like Santa hats!
These Christmas Cakesicles are the ultimate festive treat - no baking needed! With golden Oreo bases, red candy melts, and marshmallow pom-poms, they're perfect for holiday parties, gift baskets, or family fun.
Whether you're hosting a Christmas party or just want to add some festive cheer to your dessert table, these Santa hat-shaped Cakesicles are a hit. Kids love helping to decorate them, and they freeze beautifully for make-ahead convenience.
The best part? You don't need an oven or special equipment - just a few simple ingredients and a bit of creativity. Let's dive into how to make these magical holiday treats!
From the glossy red candy coating to the snowy marshmallow trim, every detail is designed to look like Santa's iconic hat. These treats are sure to be a conversation starter at any holiday gathering.
Why This Recipe Works
No-Bake Magic
These festive treats require no baking - just assemble, coat, and freeze. Perfect for last-minute holiday baking or when you need to keep your oven free for other recipes.
Gift-Worthy Presentation
The Santa hat shape and colorful decorations make these perfect for gifting in decorative jars or tins. They freeze beautifully for easy storage and transport.
Kid-Friendly Fun
Let the kids help with decorating - they'll love pressing the marshmallows and adding the glitter. It's a fun family activity that results in delicious treats!
Long-Lasting Enjoyment
These frozen treats can be made up to 3 weeks in advance and stored in the freezer. They're perfect for holiday parties throughout December.
Ingredient Notes & Substitutions
Oreo Cookies
The double-stuffed Oreo cookies provide a sturdy base for the candy coating. You can use regular Oreo cookies or substitute with chocolate sandwich cookies.
Substitutions: Use any chocolate cookie with a soft center.
Candy Melts
Red candy melts provide the glossy, festive coating. Look for Candy Corn color in the baking aisle. You can also use white candy melts with red food coloring.
Substitutions: Use white chocolate chips with red gel food coloring.
Marshmallows
Large marshmallows make the perfect pom-poms for the Santa hats. You can use mini marshmallows if you want a smaller pom-pom effect.
Substitutions: Use fondant balls painted with edible glitter for a different look.
Popsicle Sticks
Use natural wooden sticks for an authentic look. You can find these in the baking aisle or craft store. For a festive touch, wrap the sticks with red and white ribbon.
Substitutions: Use lollipop sticks or small wooden skewers.
Pro Tips for Perfect Christmas Cakesicles
Shaping Tips
When shaping the Santa hat, gently press the candy coating to create a smooth triangular shape. Use a toothpick to adjust the edges while the candy is still warm.
Frosting Tips
For a smoother coating, use a spatula to smooth the cream cheese mixture on the Oreo halves before adding the candy coating. This helps prevent air bubbles and ensures even coverage.
Freezing Tips
Place the finished Cakesicles on a parchment-lined tray in a single layer. This prevents them from sticking together during freezing. You can also place them in individual silicone molds for easier handling.
Gifting Tips
Store the frozen Cakesicles in an airtight container with parchment paper between layers. When gifting, wrap them in festive cellophane or place them in a decorative jar filled with faux snow for an extra special touch.
Variations & Customizations
Mini Santa Hats
Use mini Oreo cookies to create smaller Santa hat Cakesicles. These are perfect for appetizer platters or as party favors.
Chocolate Coating
Replace the red candy melts with dark or milk chocolate for a different flavor profile. You can also add a swirl of white chocolate for contrast.
Glitter Accents
Sprinkle edible silver or gold glitter over the red candy coating while it's still wet for a sparkling effect. This adds extra holiday sparkle to the treats.
Fruit Toppings
Use candied cherries instead of marshmallows for the pom-poms. This adds a pop of color and a slightly tart contrast to the sweet candy coating.
Serving Suggestions & Pairings
🍽️ Best Served With:
- Hot cocoa with marshmallows for a cozy holiday treat
- Spiced apple cider for a festive winter drink
- Chocolate truffles for a decadent dessert platter
🍷 Drink Pairings:
Pair these Santa hat Cakesicles with spiced chai tea or a rich red wine like Merlot. For non-alcoholic options, try cranberry juice or egg nog.
Make-Ahead Instructions & Storage
Make-Ahead Tips
These Cakesicles can be made up to 3 weeks in advance. Store them in an airtight container in the freezer. Separate layers with parchment paper to prevent sticking.
Freezer Storage
For best results, freeze the Cakesicles in a single layer on a parchment-lined tray until firm. Then transfer to an airtight container or freezer bag. They'll keep for up to 3 months.
Refrigerator Storage
If you prefer a softer texture, store the Cakesicles in the refrigerator for up to 1 week. They'll be slightly less firm but still delicious.
Reheating Instructions
These are best enjoyed frozen or chilled. If you want to serve at room temperature, remove from the freezer 10-15 minutes before serving. Avoid microwaving as it can melt the candy coating.
Troubleshooting & Common Questions
Q: My candy coating is too runny. What should I do?
A: If the candy melts are too runny, refrigerate them for 10-15 minutes to thicken. You can also add a small amount of cornstarch to thicken the mixture.
Q: The candy coating isn't setting properly. What's wrong?
A: Make sure the candy melts are at the correct temperature (usually around 105-110°F). If they're too cold, they won't set properly. If they're too hot, they'll be too runny.
Q: How can I prevent the candy coating from cracking?
A: Work quickly when coating the Cakesicles to prevent the candy from setting too quickly. If cracks do form, you can gently press the candy to smooth it out before it sets completely.
Q: The marshmallows are falling off. How can I fix this?
A: Use a small amount of melted candy to secure the marshmallows in place. You can also press them gently into the candy coating while it's still warm.
Final Thoughts
These Christmas Cakesicles are more than just a tasty treat - they're a festive masterpiece that will impress your guests and bring holiday cheer to any table. The combination of creamy Oreo, sweet candy coating, and fluffy marshmallow makes for a delightful texture and flavor.
Whether you're making them for a holiday party, gifting to friends and family, or just enjoying a special treat with your loved ones, these Santa hat Cakesicles are sure to be a hit. The best part is that they're so much fun to make - let the kids help with decorating and watch their faces light up with pride as they create their own festive masterpieces.
So why wait? Gather your ingredients and start making these magical holiday treats today. With just a little time and effort, you'll have a batch of frozen holiday cheer that's perfect for any occasion. Happy baking!